
Deploying Node-RED to Google App Engine
Node-RED is often deployed to self-hosted environments like a Raspberry PI where all the editing and configuration is done on that machine. This works fine for smaller individual projects, but leaves out the potential for using it as a general purpose workflow automation tool. By deploying our flows on Google App Engine, we can have an extensible automation platform running for dirt cheap.
This project builds on the previous work we did to setup Node-RED in a version-controlled project as a part of our series on using Node-RED as an open-source alternative to Zapier. If you just want to see an example of the final result, checkout the project on GitHub.
Locking-down the configuration
When we deploy Node-RED to our production server we want to completely disable editing functionality. There are a couple benefits to this: all changes will go through version-control, and we don’t need to worry about securing the editor. Plus since we want to use the cheaper App Engine standard environment instead of the flexible environment, the service will be deployed on a read-only filesystem.
The two settings we want to change are httpAdminRoot which when set to false will disable the editor, and readOnly which will prevent Node-RED from trying to create any config files on the host. These are configured in the settings.js file.
// ...
module.exports = {
    // ...
    /** By default, the Node-RED UI is available at http://localhost:1880/
     * The following property can be used to specify a different root path.
     * If set to false, this is disabled.
     */
    httpAdminRoot: false,
    // ...
    /** Prevent the storage module from trying to write files */
    readOnly: true,
    // ...
}
Since our default settings.js file will lock-down the editor, we’re going to need to add another npm script to override those settings for runbning the editor locally to make changes to the flows. The node-red command accepts setting overrides with the -D flag which we’ll use to revert the changes we just made.
{
  // ...
  "scripts": {
    // Override the locked-down settings for local editing
    "editor": "node-red --settings=./settings.js -D httpAdminRoot=/ -D readOnly=false",
    "start": "node-red --settings=./settings.js"
  },
  // ...
}
Now when you want to change any flows you’ll use the npm run editor command to launch the editing UI locally. After making changes and saving them with the “Deploy” button you’ll commit your changed flows.json file to Git.
Setting-up Google App Engine
Our Node-RED production service is going to run on Google App Engine which is a managed environment for running your Node.js application. The main benefits are that we don’t need to worry about any boilerplate configuration of the hosts, and with the right configuration we can actually keep everything within the forever free-tier. Simple and cheap.
For the following steps I just used the Google Cloud web console, but these steps can also be accomplished with the gcloud CLI tool if you’re more comfortable with that. First create a new project and then create an App Engine application in that project.
Now we need to setup a service account that we’ll use later to automatically update our service with GitHub Actions. Go to “IAM & Admin” then “Service Accounts”. Click on the “Create Service Account” button at the top and name it “GitHub Actions”. Next go to the “Manage Permissions” page for the service account you just created. We need to grant the account some permissions to allow it to deploy to App Engine.
- App Engine Admin (roles/appengine.appAdmin): Can manage all App Engine resources
- Service Account User (roles/iam.serviceAccountUser): To deploy as the service account
- Storage Admin (roles/compute.storageAdmin): To upload files
- Cloud Build Editor (roles/cloudbuild.builds.editor): To build the application
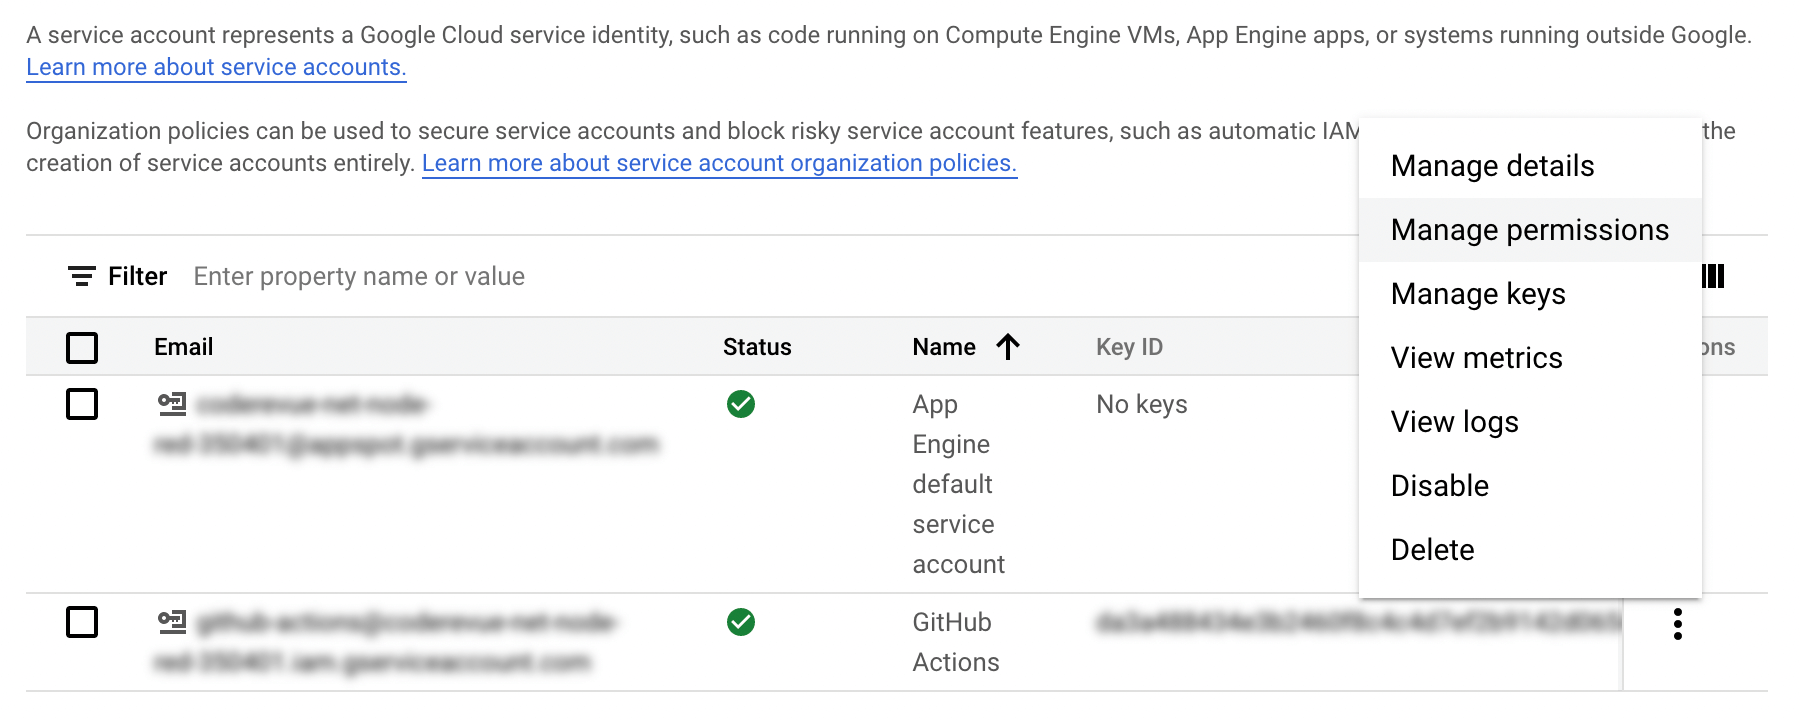
In the same area as the link to “Manage Permissions” you’ll see a link to “Manage Keys”. On this page you’ll need to click “Add Key” then select the JSON option and click “Create”. This will download a JSON file to your computer; the contents of this file are a key that we’ll use later in configuring GitHub Actions.
Finally you’ll need to enable the App Engine Admin API and Cloud Build Admin API for the project. This will require attaching a billing account to the project so go ahead and set that up if you need to.
Automatic deployment with GitHub Actions
Using GitHub Actions we can automatically update our App Engine service everytime a new flow revision is merged into the main branch. Before we get to the workflow itself though we need to setup a couple files that the gcloud CLI will use to deploy our project.
First is the app.yaml file where we’ll define some basic metadata about our service. We’ll configure our service to use the Node.js v16 runtime and some scaling parameters to keep a single instance running. The F1 instance class can run a single instance continuously through the month on the free-tier where the B1 instance class configured for a single instance with manual_scaling will cost about $23/month.
Keeping the service running a single instance at a time helps if you use polling-based triggers like incoming email, which need to have an instance running to check for new email periodically. If you only define HTTP-based incoming triggers, then you can allow the service to autoscale normally.
runtime: nodejs16
instance_class: F1
inbound_services:
  - warmup
automatic_scaling:
  min_instances: 1
  max_instances: 1
We need a way to pass in the secret key we setup using dotenv previously. Google advises against using environment variables for secrets and instead suggests using their hosted secrets service. This is a good idea for many use-cases, but for our purposes environment variables are fine.
The strategy we’re going to use to get the secret credential key deployed with our service is to store the value in a GitHub secret then write it to a .env file at deploy time and let the gcloud CLI bundle it with the application. The problem is that by default the CLI will use your .gitignore file exclusions while packaging. To get around this we’re going to create a .gcloudignore file in our project that will exclude everything in our .gitignore except for the .env file that will get written in our workflow.
#!include:.gitignore
!.env
You’ll need to setup three secrets in your GitHub repository settings for our Actions workflow to use.
- NODE_RED_CREDENTIAL_FILE_KEY: The secret key from your
.envfile. - GCP_PROJECT: The project Id of your Google Cloud Platform project.
- GCP_CREDENTIALS: The service account key generated earlier.
With those secrets in place you should be able to add this workflow to your project. This runs a workflow when changes get merged into your main branch that deploys the changes right to App Engine.
name: Deploy Node-RED to Google App Engine
on:
  push:
    branches:
      - main
jobs:
  deploy:
    runs-on: ubuntu-latest
    steps:
      - uses: actions/checkout@v2
      - name: Create .env file for deployment
        run: |
                    echo "CREDENTIAL_FILE_KEY=${{ secrets.NODE_RED_CREDENTIAL_FILE_KEY }}" >> .env
      - name: Authenticate to Google Cloud Platform
        uses: google-github-actions/auth@v0.7.1
        with:
          credentials_json: ${{ secrets.GCP_CREDENTIALS }}
      - name: Deploy to Google App Engine
        uses: google-github-actions/deploy-appengine@v0.8.0
        with:
          deliverables: app.yaml
          project_id: ${{ secrets.GCP_PROJECT }}
Once you have this workflow merged into your main branch you should see it run under your repository’s “Actions” tab. After successfully completing you should see the dashboard on the App Engine console update with information about the service, including the public URL where it’s accessible.